 |
|
 03-18-2022, 03:03 PM
|
#1
|
|
Winnebago Owner
Join Date: Jan 2022
Posts: 80
|
2014 Vista Headlight repair
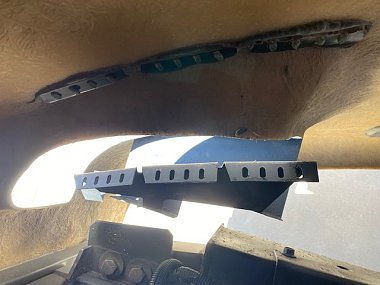
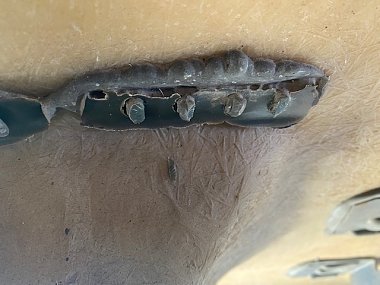
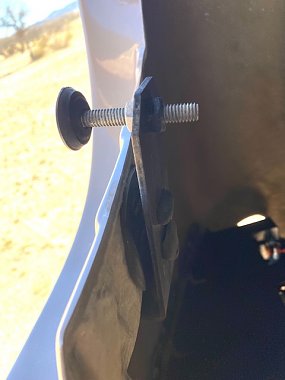
Head Light assembly upper bracket came off. It appears it was glued on (I have no idea what type) Anyone know what they used or have had this issue. I could just use construction adhesive but not sure it would be flexible enough for bouncing down the road. See photos. TIA
__________________
Larry & Vicky
Borrego Springs, CA
2014 Vista 30T, Koni Shocks, Safe-T-Plus, CHF with Z Brackets, Track Bar, 5 Star Tuning.
|

|

|
 03-23-2022, 01:21 PM
|
#2
|
|
Winnebago Owner
Join Date: Jan 2022
Posts: 80
|
I am glad to see no one else has had this repair to do. I also posted on [email protected] and had some folks reply who have done this repair before. But for what its worth, I wanted to at least include the product most folks used to do this repair.
https://www.3m.com/3M/en_US/p/d/b40066996/
__________________
Larry & Vicky
Borrego Springs, CA
2014 Vista 30T, Koni Shocks, Safe-T-Plus, CHF with Z Brackets, Track Bar, 5 Star Tuning.
|

|

|
 03-23-2022, 01:53 PM
|
#3
|
|
Proud “No Intent” Owner
Join Date: Jul 2019
Location: Belmont, CA
Posts: 1,778
|
It’s unfortunate that nobody got back to you from this site. I haven’t seen anyone else have a problem with their headlight becoming dislodged from the fiberglass but I have seen plenty of Winnebago hoods where they connect coming loose and falling off. This is the product that was recommended on those posts. Good luck on your repair!
https://smile.amazon.com/gp/product/...A5ZTBCX8&psc=1
|

|

|
 03-23-2022, 02:47 PM
|
#4
|
|
Winnebago Master
Join Date: Apr 2018
Location: Tucson, AZ
Posts: 1,453
|
I used the 3M 5200 product on my front clip when the lower brackets came loose and it worked great. One thing to note, it needs humidity to cure. Mine was not curing since, like the OP, I live in the desert. Once I realized this I got wet towels and laid them on the repair and it cured very nicely. I like it because it it not so rigid like the original epoxy and it really, really holds on.
__________________
Brian
2011 Winnebago Via 25Q on 2010 Sprinter Chassis
|

|

|
 03-23-2022, 02:59 PM
|
#5
|
|
Winnebago Owner
Join Date: Jan 2022
Posts: 80
|
Quote:
Originally Posted by bigb

I used the 3M 5200 product on my front clip when the lower brackets came loose and it worked great. One thing to note, it needs humidity to cure. Mine was not curing since, like the OP, I live in the desert. Once I realized this I got wet towels and laid them on the repair and it cured very nicely. I like it because it it not so rigid like the original epoxy and it really, really holds on.
|
Hi Brian
Question? did you remove and prep the area where the old goop was? And did you use the 5200FC - FC = Fast Cure (which the specs say is 50-90 minutes) TIA
__________________
Larry & Vicky
Borrego Springs, CA
2014 Vista 30T, Koni Shocks, Safe-T-Plus, CHF with Z Brackets, Track Bar, 5 Star Tuning.
|

|

|
 03-23-2022, 03:33 PM
|
#6
|
|
Winnebago Master
Join Date: Apr 2018
Location: Tucson, AZ
Posts: 1,453
|
Quote:
Originally Posted by xjaywalker

Hi Brian
Question? did you remove and prep the area where the old goop was? And did you use the 5200FC - FC = Fast Cure (which the specs say is 50-90 minutes) TIA
|
I cleaned all the old stuff off the metal brackets that were slotted to allow the original goop to squeeze thru, I used an angle grinder. Then I used the angle grinder to rough up the goop on the fiberglass where it was still adhered. When I applied the 5200 I used enough that it made contact with the original goop plus more around the edges so my new stuff is also further attached to the fiberglass beyond where the original was. I did not use the fast cure, didn't even know about it. With the delay in curing before I discovered the wet towel trick it took about a week before I felt it was cured enough to put into use, it cures very slowly which is probably why it holds so well.
I did remove the entire front clip and had it laying face down in the garage for a week waiting to cure.
__________________
Brian
2011 Winnebago Via 25Q on 2010 Sprinter Chassis
|

|

|
 03-23-2022, 03:46 PM
|
#7
|
|
Winnebago Master
Join Date: Apr 2018
Location: Tucson, AZ
Posts: 1,453
|
A couple of pics, I also put some where the fiberglass had a small crack on the back side:
__________________
Brian
2011 Winnebago Via 25Q on 2010 Sprinter Chassis
|

|

|
 03-23-2022, 04:09 PM
|
#8
|
|
Winnebago Owner
Join Date: Jan 2022
Posts: 80
|
Quote:
Originally Posted by bigb

A couple of pics, I also put some where the fiberglass had a small crack on the back side:
|
Quote:
Originally Posted by bigb

I cleaned all the old stuff off the metal brackets that were slotted to allow the original goop to squeeze thru, I used an angle grinder. Then I used the angle grinder to rough up the goop on the fiberglass where it was still adhered. When I applied the 5200 I used enough that it made contact with the original goop plus more around the edges so my new stuff is also further attached to the fiberglass beyond where the original was. I did not use the fast cure, didn't even know about it. With the delay in curing before I discovered the wet towel trick it took about a week before I felt it was cured enough to put into use, it cures very slowly which is probably why it holds so well.
I did remove the entire front clip and had it laying face down in the garage for a week waiting to cure.
|
Well the wet towel trick was something I didn't think about. Thank you for that. I am going to have to get creative to figure out how to clamp the bracket while curing. Thats why I was hoping for a product that would cure quickly, the 5200FC says it sets in 50-60 minutes to a tacky state. Not sure that will help. I already ordered the 5200, being out here in Pearce, its not like I can drive around the block to Lowes or Home Depot.  we are very dependent on Amazon. 
__________________
Larry & Vicky
Borrego Springs, CA
2014 Vista 30T, Koni Shocks, Safe-T-Plus, CHF with Z Brackets, Track Bar, 5 Star Tuning.
|

|

|
 03-23-2022, 04:16 PM
|
#9
|
|
Winnebago Master
Join Date: Apr 2018
Location: Tucson, AZ
Posts: 1,453
|
I wouldn't be afraid to use the quick set formula. You will want to leave enough of the old stuff to give you a reference to get it back in the exact same spot.
Used to have a friend from Pearce, Jim Johnson. That was over 30 years ago.
My wife's family is from Cochise County (ranchers) and knew people in Pearce.
__________________
Brian
2011 Winnebago Via 25Q on 2010 Sprinter Chassis
|

|

|
 03-25-2022, 04:50 PM
|
#10
|
|
Winnebago Owner
Join Date: Jan 2022
Posts: 80
|
Quote:
Originally Posted by bigb

A couple of pics, I also put some where the fiberglass had a small crack on the back side:
|
Wow! I was hoping to avoid taking off the front clip. However I am guessing it is necessary due to the viscosity of the 5200. Oh well. 
Thanks these helped a lot. 
__________________
Larry & Vicky
Borrego Springs, CA
2014 Vista 30T, Koni Shocks, Safe-T-Plus, CHF with Z Brackets, Track Bar, 5 Star Tuning.
|

|

|
 03-26-2022, 10:08 AM
|
#11
|
|
Winnebago Master
Join Date: Apr 2018
Location: Tucson, AZ
Posts: 1,453
|
Quote:
Originally Posted by xjaywalker

Wow! I was hoping to avoid taking off the front clip. However I am guessing it is necessary due to the viscosity of the 5200. Oh well. 
Thanks these helped a lot.  |
Maybe you can glue it in then hold it in place with sticks or even some old pillows? The 5200 is not so thin that it runs, it just takes a while to cure. It's actually pretty thick. Whatever you do you will want to be able to re-wet the towels every 12 hours or so. Once I figured out to put the wet towels on the curing process really accelerated.
__________________
Brian
2011 Winnebago Via 25Q on 2010 Sprinter Chassis
|

|

|
 03-26-2022, 01:37 PM
|
#12
|
|
Proud “No Intent” Owner
Join Date: Jul 2019
Location: Belmont, CA
Posts: 1,778
|
I like Bob’s idea, and it just dawned on me that those tension rods we use to keep stuff from moving around in our refrigerator might work?
Like these…
https://www.amazon.com/dp/B0881DWZGN/
|

|

|
 03-27-2022, 09:45 AM
|
#13
|
|
Winnebago Owner
Join Date: Jan 2022
Posts: 80
|
Quote:
Originally Posted by bigb

I wouldn't be afraid to use the quick set formula. You will want to leave enough of the old stuff to give you a reference to get it back in the exact same spot.
Used to have a friend from Pearce, Jim Johnson. That was over 30 years ago.
My wife's family is from Cochise County (ranchers) and knew people in Pearce.
|
Wow!! Small world.
|

|

|
 03-27-2022, 09:46 AM
|
#14
|
|
Winnebago Owner
Join Date: Jan 2022
Posts: 80
|
Quote:
Originally Posted by bigb

Maybe you can glue it in then hold it in place with sticks or even some old pillows? The 5200 is not so thin that it runs, it just takes a while to cure. It's actually pretty thick. Whatever you do you will want to be able to re-wet the towels every 12 hours or so. Once I figured out to put the wet towels on the curing process really accelerated.
|
Thank you. We will give it a go today. I appreciate all your tips and help.
|

|

|
 03-28-2022, 02:21 AM
|
#15
|
|
Winnie-Wise
Join Date: Apr 2016
Posts: 294
|
xjaywalker, good luck on your project, but when you're finished, as others have mentioned I'd check the other lights, hood hinges (one of mine fell off in my hand) and grill brackets if you have them. 5 of my 10 grill brackets had come loose.
Although my hood hinges have been repaired, I now have them wire tied on in case one comes loose I don't want to lose them, nor run over them and possibly cause tire damage or a hole in the oil pan.
It's a bad design by Winnie but it's what we've got. 
__________________
2015 Itasca Sunstar 35F
|

|

|
 03-28-2022, 12:28 PM
|
#16
|
|
Winnebago Owner
Join Date: Jan 2022
Posts: 80
|
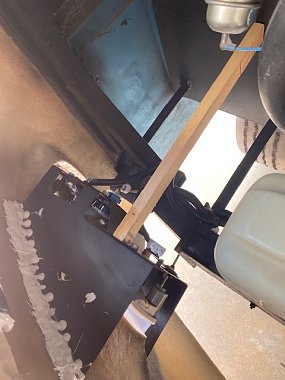
Well I took Brians advice, being from the Tucson area, knowing we have a very low humidity climate and the 3M needs to cure in 50% humidity. I wet some towels, (actually soaked really good) see photos. My little humidity monitor was at around 62% last night and now at 73% (I have to keep it pretty soaked). Still gooey and slowly setting up. Only been 24 hours, so she is not going anywhere soon. Thanks again Brian the wet (soaked) towel is helping in our dry climate in Southwest AZ, as well as the high tech stick method  . But we have rain forecasted for tomorrow, so may help a bit.  New Headlights look well aligned (alignment test after 3M cure) 
__________________
Larry & Vicky
Borrego Springs, CA
2014 Vista 30T, Koni Shocks, Safe-T-Plus, CHF with Z Brackets, Track Bar, 5 Star Tuning.
|

|

|
 03-28-2022, 12:40 PM
|
#17
|
|
Winnebago Owner
Join Date: Jan 2022
Posts: 80
|
Here is a better photo of the 3M Glue Job. 
__________________
Larry & Vicky
Borrego Springs, CA
2014 Vista 30T, Koni Shocks, Safe-T-Plus, CHF with Z Brackets, Track Bar, 5 Star Tuning.
|

|

|
 03-28-2022, 12:55 PM
|
#18
|
|
Winnebago Owner
Join Date: Jan 2022
Posts: 80
|
Quote:
Originally Posted by Upinsmoke

xjaywalker, good luck on your project, but when you're finished, as others have mentioned I'd check the other lights, hood hinges (one of mine fell off in my hand) and grill brackets if you have them. 5 of my 10 grill brackets had come loose.
Although my hood hinges have been repaired, I now have them wire tied on in case one comes loose I don't want to lose them, nor run over them and possibly cause tire damage or a hole in the oil pan.
It's a bad design by Winnie but it's what we've got.  |
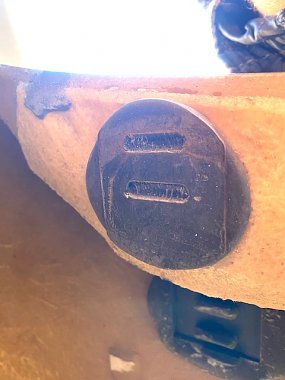
Thanks UpinSmoke!  You are correct! Good thing I order another tube of this 3M 5200. Here I found a hood adjustment bracket loose and one completely gone (Now in search of that part online). So going to Goop Up as much as I can. You are correct its a bad manufacturing design (not sure why they thought this would work in the long haul, but maybe that was their plan all along  ) Here are some photos of the missing and regaled bracket to hold the adjustment screw in place. Anyone know where I can find one of these?? TIA 
__________________
Larry & Vicky
Borrego Springs, CA
2014 Vista 30T, Koni Shocks, Safe-T-Plus, CHF with Z Brackets, Track Bar, 5 Star Tuning.
|

|

|
 03-28-2022, 02:56 PM
|
#19
|
|
Winnebago Camper
Join Date: Jul 2015
Posts: 13
|
Quote:
Originally Posted by xjaywalker

Head Light assembly upper bracket came off. It appears it was glued on (I have no idea what type) Anyone know what they used or have had this issue. I could just use construction adhesive but not sure it would be flexible enough for bouncing down the road. See photos. TIA
Attachment 182279
Attachment 182280 |
I used Gorilla Construction Adhesive to glue most of the parts on the inside my front about 3 years ago. Still holding strong. I suggest drilling more holes on the parts and getting the paint off where the glue will be applied to metal. After setting in place then add more Adhesive on top to hold in place.
|

|

|
 03-29-2022, 03:17 AM
|
#20
|
|
Winnie-Wise
Join Date: Apr 2016
Posts: 294
|
xjaywalker, welcome, and my philosophy when I was repairing my hood and grill brackets was that if it had glue on it from the factory, and I could reach it, I put more (new) glue on it and widened the area some. So far, no problems, fingers crossed.
I'd at least do the hood hinges and wire tie them.
As to finding the part, Lichtsinn RV might be able to help, or recently there was a post naming two RV salvage yards - don't remember the name but you could probably Goggle them.
__________________
2015 Itasca Sunstar 35F
|

|

|
 |
|
|
Currently Active Users Viewing This Thread: 1 (0 members and 1 guests)
|
|
|
 Posting Rules
|
You may not post new threads
You may not post replies
You may not post attachments
You may not edit your posts
HTML code is Off
|
|
|
|
 » Recent Discussions
 |
|
|
|
|
|
|
|
|
|
|
|
|
|
|
|
|
|
|
|
|
|
|
|
|
|