Journey with Confidence RV GPS App RV Trip Planner RV LIFE Campground Reviews RV Maintenance Take a Speed Test Free 7 Day Trial ×
 

Go Back   Winnebago Owners Online Community > WINNEBAGO TECH & TOW > General Maintenance and Repair
Click Here to Login
Register FilesRegistry Blogs FAQ Community Calendar Today's Posts Log in

Reply
 
Thread Tools Search this Thread Display Modes
 
Old 12-18-2015, 08:05 PM   #1
Winnebago Owner
 
Nomad Mike's Avatar
 
Join Date: Nov 2014
Location: Nomadic - Currently Near Lassen NF
Posts: 218
Roof Liner - How To Get Trim Piece Off?

So my roof liner sags in a few places and has popped open at this trim; I know from research it is a common issue.
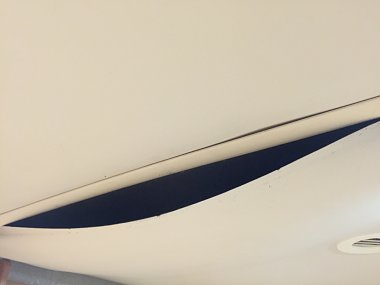
Click image for larger version

Name:	IMG_1722.jpg
Views:	310
Size:	94.6 KB
ID:	114458

I've seen several threads on repairs and the one commonality is that spraying glue and sticking it back will not work.

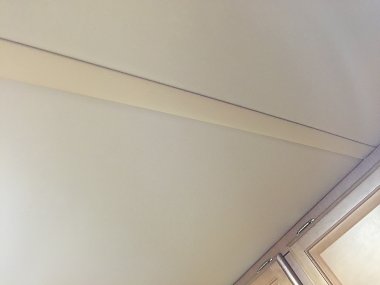
I'm planning on getting this trim piece off and maybe scraping any foam insulation off under the trim piece to get to the luan. I will then use a 3M spay adhesive and staples and then put the trim back.

Question is how do I get this trim piece off?
Click image for larger version

Name:	IMG_1724.jpg
Views:	612
Size:	121.0 KB
ID:	114460
Is it just wedged between the cabinets and or glued?

Any 3M adhesive recommendations? I'm thinking 3M 80 for Rubber and Vinyl.
Attached Thumbnails
Click image for larger version

Name:	IMG_1723.jpg
Views:	515
Size:	136.2 KB
ID:	114459   Click image for larger version

Name:	IMG_1726.jpg
Views:	987
Size:	145.3 KB
ID:	114461  

__________________
Luna was born in 2005 and is a Winnebago Journey 34H w/ CAT C7 350
[SIGPIC][/SIGPIC]
Nomad Mike is offline   Reply With Quote
Old 12-19-2015, 07:22 AM   #2
Winnebago Master
 
DancinCampers's Avatar
 
Join Date: Nov 2004
Location: On the Road Westward
Posts: 716
If it is like ours, looking from the end, it looks like a flattened letter C. The trim snaps over a metal track. Careful removing, as they have a tendency to break.
__________________
Dan & Sharon & Kasey (Our Yorkie Puppy (12 Yrs Old) On the Road (2012 Journey 36M, 2006 Jeep Liberty)
USN-Ret ('65-'93) Fulltimers, Class of 2012
DancinCampers is offline   Reply With Quote
Old 12-19-2015, 07:29 AM   #3
Winnebago Camper
 
slowmachine's Avatar
 
Join Date: Dec 2014
Location: Alton, NH
Posts: 15
Winnebago may be different, but my ceiling trim strips look like this in cross-section. It is a t-molding that simple pressed into a slot.

Click image for larger version

Name:	ImageUploadedByiRV2 - RV Forum1450535353.716966.jpg
Views:	499
Size:	74.8 KB
ID:	114478


Mike
2000 Holiday Rambler Endeavor 40PBD
Freghtliner XC, CAT 3126B
__________________
Mike
2000 Holiday Rambler Endeavor 40PBD
Freightliner XC, CAT 3126B
slowmachine is offline   Reply With Quote
Old 12-20-2015, 12:25 AM   #4
Winnebago Owner
 
Nomad Mike's Avatar
 
Join Date: Nov 2014
Location: Nomadic - Currently Near Lassen NF
Posts: 218
Quote:
Originally Posted by DancinCampers View Post
If it is like ours, looking from the end, it looks like a flattened letter C. The trim snaps over a metal track. Careful removing, as they have a tendency to break.
Quote:
Originally Posted by slowmachine View Post
Winnebago may be different, but my ceiling trim strips look like this in cross-section. It is a t-molding that simple pressed into a slot.

Attachment 114478


Mike
2000 Holiday Rambler Endeavor 40PBD
Freghtliner XC, CAT 3126B
I have found that I could take a peek at the end of one in my bathroom as it ends at the vent.

It is a flattened "C" which looks just like Mike's picture - for the plastic part. I was able to slide the bath one off and the retainer is screwed into the roof.

I found the plastic part on Amazon just in case I break it.

Any suggestions for removing it without breaking it?
__________________
Luna was born in 2005 and is a Winnebago Journey 34H w/ CAT C7 350
[SIGPIC][/SIGPIC]
Nomad Mike is offline   Reply With Quote
Old 12-20-2015, 07:23 PM   #5
Winnebago Owner
 
lwasouth's Avatar
 
Join Date: Oct 2008
Posts: 176
Removing trim

Yes, it is like a calapesed "C". I took a piece if galvanized sheet metal (like heat duct) about 2" x 6 inches. On 1 end I bent about a 1/8" right angle.
I hooked this under the edge of the plastic and pulled it off. Once started the whole piece came off. Make sure it is warm in the coach and it will not crack
On a trip in 2011 the entire headliner started to come down. I ended up removing all the vinyl and the foam backing from the ceiling. I replaced the entire ceiling with an acustic carpet type material. Look on line under acustic material suppliers. Material comes 54 inches wide by any length, you can trim the width to 48 inches. The glue is 3M 90 spray glue.

We had an 05 Itasca horizon
lwasouth is offline   Reply With Quote
Old 12-20-2015, 09:38 PM   #6
Winnebago Owner
 
Nomad Mike's Avatar
 
Join Date: Nov 2014
Location: Nomadic - Currently Near Lassen NF
Posts: 218
Quote:
Originally Posted by lwasouth View Post
Yes, it is like a calapesed "C". I took a piece if galvanized sheet metal (like heat duct) about 2" x 6 inches. On 1 end I bent about a 1/8" right angle.
I hooked this under the edge of the plastic and pulled it off. Once started the whole piece came off. Make sure it is warm in the coach and it will not crack
On a trip in 2011 the entire headliner started to come down. I ended up removing all the vinyl and the foam backing from the ceiling. I replaced the entire ceiling with an acustic carpet type material. Look on line under acustic material suppliers. Material comes 54 inches wide by any length, you can trim the width to 48 inches. The glue is 3M 90 spray glue.

We had an 05 Itasca horizon
Thanks, I decided to give it a quick fix. I used some shims and gave myself some room between the metal/plastic trim and luan, pushed the liner back in and shot 1" long narrow crown staples at an angle. They are hidden under the trim and holding the vinyl liner. Not perfect, but good enough for now until I decide on a permanent fix and have the time to do it.

Click image for larger version

Name:	IMG_1728.jpg
Views:	470
Size:	145.8 KB
ID:	114584

Click image for larger version

Name:	IMG_1730.jpg
Views:	402
Size:	107.4 KB
ID:	114585

When you did the acoustic carpet, did you pull the cabinets down too? That sounds like a big mess with all the sticky foam flying all over the place.
__________________
Luna was born in 2005 and is a Winnebago Journey 34H w/ CAT C7 350
[SIGPIC][/SIGPIC]
Nomad Mike is offline   Reply With Quote
Old 12-21-2015, 07:44 AM   #7
Winnebago Owner
 
lwasouth's Avatar
 
Join Date: Oct 2008
Posts: 176
Ceiling headliner replacement

I did remove the kitchen cabinet, but cut around all others.
To remove the foam from the ceiling you need a sharp scraper and a drop cloth to protect the area your working in. I used a 5 in 1, it was about the right size and I stone sharpened it. Final cleaning of the ceiling was with the backside of an old piece of carpet. New material was purchased from Neil Gold at Goldman Acoustics in New York. They will furnish samples and have product shipped to you. I have some photos of the installation (If I can find them) Lwasouth
lwasouth is offline   Reply With Quote
Old 12-21-2015, 09:06 AM   #8
Winnebago Owner
 
lwasouth's Avatar
 
Join Date: Oct 2008
Posts: 176
Photo ceiling install

Photo shows installation of ceiling fabric held in place by strip of l/4 inch plywood.Click image for larger version

Name:	Ceiling install.jpg
Views:	539
Size:	35.1 KB
ID:	114615
lwasouth is offline   Reply With Quote
Old 12-21-2015, 09:14 AM   #9
Winnebago Camper
 
powderman's Avatar
 
Join Date: Mar 2010
Location: N. E. Ohio & Lady Lake Fl.
Posts: 13
Quote:
Originally Posted by lwasouth View Post
To remove the foam from the ceiling you need a sharp scraper and a drop cloth to protect the area your working in. Lwasouth
I'm not sure, but it seems that the scrapper that is attached to a dust pan like they sell for removing popcorn ceilings would work well.
__________________
Ron WD8CBT

I started out with nothing and I still have most of it left
powderman is offline   Reply With Quote
Old 12-21-2015, 09:32 AM   #10
Winnebago Owner
 
lwasouth's Avatar
 
Join Date: Oct 2008
Posts: 176
Scraper

Popcorn ceiling is very soft and easy to remove. This foam/glue requires a sharp scraper and firm touch. Good luck.
lwasouth is offline   Reply With Quote
Reply

Tags
roof


Currently Active Users Viewing This Thread: 1 (0 members and 1 guests)
 

Posting Rules
You may not post new threads
You may not post replies
You may not post attachments
You may not edit your posts

BB code is On
Smilies are On
[IMG] code is On
HTML code is Off
Trackbacks are Off
Pingbacks are Off
Refbacks are Off


Similar Threads
Thread Thread Starter Forum Replies Last Post
Trim Breaking Off 2014 Itasca Journey tjd Winnebago Class A Motorhomes 6 06-23-2016 02:53 PM
Shower liner crack (wraparound) Gordo Plumbing | Systems and Fixtures 7 04-13-2006 05:22 PM
22.5 Inch Front Wheel Liner Rattle DriVer Running Gear, Axles, Brakes, Wheels and Tires 13 09-26-2005 09:17 AM

» Featured Campgrounds

Reviews provided by

Disclaimer:

This website is not affiliated with or endorsed by Winnebago Industries or any of its affiliates. This is an independent, unofficial site.


All times are GMT -6. The time now is 10:23 AM.


Powered by vBulletin® Version 3.8.8 Beta 1
Copyright ©2000 - 2024, vBulletin Solutions, Inc.