 |
 10-16-2020, 06:54 PM
|
#1
|
|
Winnebago Owner
Join Date: Sep 2020
Posts: 95
|
Journey - TV Upgrade
Anyone have documentation or pictures of upgrading the TV in a Winnebago Journey. I have the old TV ripped out just looking for ideas on what others have done. No need to reinvent the wheel if someone has something that works.
|

|

|
 10-17-2020, 05:50 AM
|
#2
|
|
Winnebago Master
Join Date: Jul 2019
Location: Branson MO area
Posts: 779
|
I can tell you what the folks that had my rig did. The TV is located between the front seats, above the dash. The folks made a plywood wall in the cavity, using screws to hold it in place going through the side of the cabinet. They then put a very nice wall mount tv bracket on the wall and then the tv. The wall they made and the sides of the cabinet they then painted black to make everything look good.
You may want to add a signature line to your posts. The year and model of your rig will help in future post you have.
__________________
07 Meridian 36G
Roadmaster tow dolly
Great Wife!! & Max the Frisbee chasing dog.
|

|

|
 10-20-2020, 10:43 AM
|
#3
|
|
Winnebago Master
Join Date: Dec 2009
Location: Out there, somewhere
Posts: 1,750
|
Quote:
Originally Posted by bjboles

Anyone have documentation or pictures of upgrading the TV in a Winnebago Journey. I have the old TV ripped out just looking for ideas on what others have done. No need to reinvent the wheel if someone has something that works.
|
bj,
First, you don't say what year your Journey is. There may be different designs in model years. Usually, not many changes. But, changing out a TV, especially the front TV, can be quite a bit of work, depending on what you want in results and the end appearance. I myself, when I changed ours out, I didn't want it looking like Sanford and Son did it, with a giant flat screen glued to the front of the top cabinets, blocking the entry for the two side cabinets and looking horrible.
Our coach is an '04 Itasca Horizon 36GD with the CAT C-7 330HP and, my thought(s) is/are, that I wanted the end result to appear as if Winne/Itasca did that changed out TV, in the factory. We don't need a MONSTER TV up there, just something that's nice and modern.
I removed that horribly heavy (right at 108 lbs.) Sony boat anchor. Then, since that Sony needed a ton of steel bracing to secure it, there was no need for that bracing and, the large plastic cage that surrounded the backside of that Sony, so, I took a whole day to use three different kinds of metal saws to remove that cage. Waaaaaaaaaaaaaay better.
The front face frame of the original Sony TV comes off as a single unit. Well, since the new LED 32" Samsung only weighs EIGHT POUNDS, I simply devised a way to attach that new TV to that face frame in such a manor that, it appears that the TV was/is, the original one in that coach. And, since that face frame mounts and is removable so easily, that TV is easily serviced (not that it ever would ne needed to be serviced) simply by removing the side bolts. I changed the side SCREWS to side BOLTS with T-nuts.
When I was done with the primary set up, I created a flush backing to replace that uglier than sin, huge plastic that used to hang back there.
It's all seriously better than it was. Let me know if you'd like to see pics.
Scott
__________________
2004 ITASCA HORIZON 36GD, 2011 GMC Sierra 1500 4x4 Toad '08 GL 1800 Gold Wing  Retired-29.5 yrs, SDFD, Ham - KI6OND
Me, Karla and the Sophie character, (mini Schnauzer)
|

|

|
 10-25-2020, 12:10 PM
|
#4
|
|
Winnebago Master
Join Date: Dec 2009
Location: Out there, somewhere
Posts: 1,750
|
Well,
Guess he wasn't too worried about help.
Scott
__________________
2004 ITASCA HORIZON 36GD, 2011 GMC Sierra 1500 4x4 Toad '08 GL 1800 Gold Wing  Retired-29.5 yrs, SDFD, Ham - KI6OND
Me, Karla and the Sophie character, (mini Schnauzer)
|

|

|
 10-25-2020, 12:37 PM
|
#5
|
|
Winnebago Owner
Join Date: Sep 2020
Posts: 95
|
Fire Up. Please send some pics. I think I'm going to keep the original metal frame work and come off that will some brackets. Maybe use a swing out adjustable TV mount so I can get behind to the connections. Also plan on installing new DVD player below TV since there will be a gap. That way it will be easier for the kids to put in movie vs. by the compartment above the steps.
__________________
04 Winnebago Journey 34H 330 CAT
|

|

|
 10-28-2020, 05:53 PM
|
#6
|
|
Winnebago Owner
Join Date: Jun 2016
Location: DeLand, FL
Posts: 64
|
TV replacement
I think my comments will not really consider model or specific MH. Several years ago in our '07 Suncruiser I replaced the bedroom TV with a flat screen. I found one that would fit in the space at a big box store (measuring tape in hand). I brought it back and after removing the old unit, I fabricated a wood mounting wall and TV mount that would use the same tie down as the original TV. It took some careful measuring and some woodworking equipment, but it fit beautifully. I did have one "find". I found some prefinished doors at a Habitat store that almost perfectly matched my interior wood finish. I cut those to side and used them to finish off the installation.
__________________
2014 Winnebago Adventurer 38Q
2017 GMC Acadia Toad
'09 BMW R1200RT/'02 BMW K1200LT w/Hannigan car
|

|

|
 10-28-2020, 06:25 PM
|
#7
|
|
Winnebago Camper
Join Date: May 2012
Location: Canada for the summer
Posts: 29
|
Quote:
Originally Posted by bjboles

Fire Up. Please send some pics. I think I'm going to keep the original metal frame work and come off that will some brackets. Maybe use a swing out adjustable TV mount so I can get behind to the connections. Also plan on installing new DVD player below TV since there will be a gap. That way it will be easier for the kids to put in movie vs. by the compartment above the steps.
|
I can send you pictures of what I did in my 2004 Meridian 34 H.
replaced both front and rear TV with flat screens ( always hit my head on the rear one as it stuck out too far.) The front is a 32 which fits fine. Need to check size on the rear
I have also replaced all speaker and have a Marantz home audio receiver providing true surround sound. The front TV layout is great for a nice surround sound system.
Both TV's have lasted now for close to 90000 miles - many in Canada and Alaska.
Let me know exactly what you need and I can take a few more pics..
|

|

|
 10-28-2020, 09:15 PM
|
#8
|
|
Winnebago Owner
Join Date: Sep 2020
Posts: 95
|
Nalle, please send some random pics of both living and bedroom tvs
__________________
04 Winnebago Journey 34H 330 CAT
|

|

|
 10-29-2020, 10:37 AM
|
#9
|
|
Winnebago Owner
Join Date: Sep 2020
Posts: 95
|
I finished
I finished the TVD upgrade. Pretty happy how it turned out. Relocated the DVD player to make it more user friendly
|

|

|
 10-29-2020, 10:48 AM
|
#10
|
|
Winnebago Owner
Join Date: Sep 2020
Posts: 95
|
Pics
Here are a couple pics
|

|

|
 10-29-2020, 11:13 AM
|
#11
|
|
Winnebago Owner
Join Date: Sep 2020
Posts: 95
|
Another pic
Side view
|

|

|
 10-29-2020, 12:26 PM
|
#12
|
|
Winnebago Watcher
Join Date: May 2012
Posts: 2
|
bjboles, We have an 05 Journey and live in California with the worst highways that just shake everything in the coach. How do you keep the tv from working it's way out of the stored position? By the way, Great pics.
|

|

|
 10-29-2020, 12:49 PM
|
#13
|
|
Winnebago Owner
Join Date: Sep 2020
Posts: 95
|
Thanks DaveyBoy05. I tightened the bolt on the mount that extends the TV out pretty tight so we'll see how it does. It takes a pretty good tug to move it. I do have some other ideas if it wanders out. The back of the TV contacts the wood frame so maybe velcro would hold it, right now I just have a felt chair leg bumper on that contact point to control the noise/rubbing.
__________________
04 Winnebago Journey 34H 330 CAT
|

|

|
 10-29-2020, 09:26 PM
|
#14
|
|
Winnebago Camper
Join Date: May 2012
Location: Canada for the summer
Posts: 29
|
TV replacement
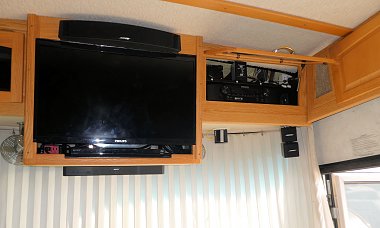
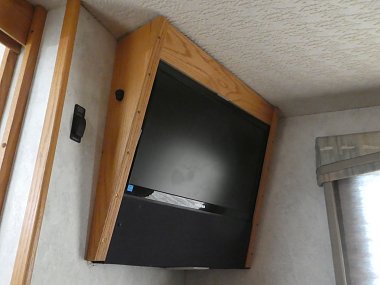
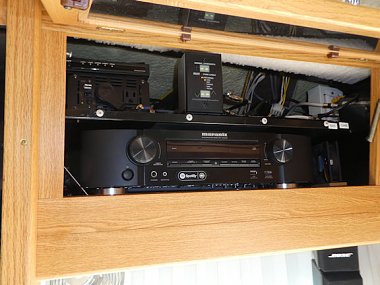
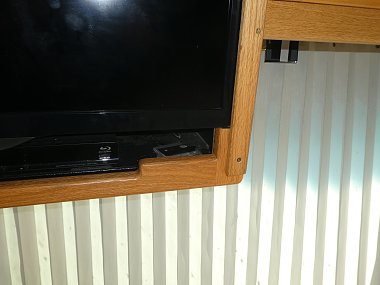
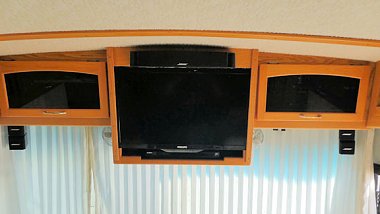
So, for both front and rear, I used the existing frames and cut them wider to fit the TV and provide a small lower corner shelf to support the TV. See pics.
Vertical oak strips secure the TV inside the frame. The rear TV cabinet was reused and cut shallower for the flat screen TV and give me room to get in to the bed without hitting my head all the time..
A Marantz NR1506 A/V receiver sends HDMI to both TV's for DVD, Satelllite, etc.
To get HDMI to the back, I ran dual Ethernet/HDMI under the RV. Has worked fine.
The DVD player fits nicely under the front TV and is connected to the Marantz giving the option to play in the front or the back.
The DHS fake surround sound was replaced with the Marantz. All original speaker were replaced with Bose in front and Fosgate is rear and for subwoofer..
The speaker below the front TV is for the car radio and for Iphone Bluetooth for travelling music and audio books.
Front system and rear TV has their own inverter when no AC available.
Both TV's have at least 90000 miles on them with lots of miles i Alaska and Canada without any problems
|

|

|
 10-29-2020, 09:31 PM
|
#15
|
|
Winnebago Camper
Join Date: May 2012
Location: Canada for the summer
Posts: 29
|
TV replacement
Forgot to mention that the little black box hanging below the Marantz is a Travel modem, connected to the Marantz with Ethernet cable and providing internal RV WiFi for computer printing, etc. also providing some isolation when connecting to campground internets. With good WiFi it is good enough for movie streaming.
|

|

|
 11-06-2020, 10:36 PM
|
#16
|
|
Winnebago Master
Join Date: Dec 2009
Location: Out there, somewhere
Posts: 1,750
|
Well,
Just got back to this thread. Sorry for the delay. For starters, I have/had no need for the TV to pivot or swing out in our opinions and thought processing. So, to mount it solidly was the plan. We don't have kids (all grown and gone) so, since the original Sony boat anchor weighed right at 108 lbs, and the new LED 32" flat screen weighs a whopping 8 lbs., I also did not need the giant pain in the a$$ metal structure so, I eliminated it.
Since the new TV weighs only 8 lbs., I used the front face frame of the original TV to mount the TV to. When attached to the back of that face frame, I slid that face frame back up into its original position, with TV attached and, it looks like Winne/Itasca did the build. And, there is no monstrosity of steel and ugly bobus plastic back there like there was when the original boat anchor was there.
There was a hole where that steel and plastic was so, I made a cover plate from 1/8" Birch paneling that matched the surrounding wood pretty close. As for sound, I yanked out all that Winnebago make-believe surround and installed a Marantz 1500 (I think that is the number, if not, I'll correct later) stereo receiver/amp. Since all the sound system wiring was in my lower front compartment, just in front of the left front tire, I needed to re-route all that speaker amp wiring up to the upper cabinet, in front of the passenger. Talk about an L.A. freeway of wiring. I was on that wiring for about 3-4 days.
I had to purchase and install a *Pre-amp* for the two factory installed bass speakers. Once all this was done, the new LED TV is LIGHT YEARS ahead of that Sony that was in there. And my sound system is also LIGHT YEARS ahead of that Winnebago fake system. I'm definitely glad I went through the 30+ days of tear down and rebuild of that system. Sooooooooooo much better than it was. I was so happy with that re-build, I jumped right into the rebuild of the rear bedroom TV system.
Again, we have zero need to pivot that new LED TV in the bed room, again, I used the face frame to actually attach the TV to and that, just like the front TV, made for a seriously stable and strong mounting system. And, to service it, if and when it's EVER needed, is ultimately easy to do, just like the front TV.
Scott
In the first two pics, you see the original face frame and, the Sony boat anchor in place. The second pics show the modified face frame and TV attached to it. There are two small screws that hold that face frame in place from the factory. I enlarged the holes and put T-nuts in the proper place. Now, I use BOLTS to hold that face frame up, not screws.
__________________
2004 ITASCA HORIZON 36GD, 2011 GMC Sierra 1500 4x4 Toad '08 GL 1800 Gold Wing  Retired-29.5 yrs, SDFD, Ham - KI6OND
Me, Karla and the Sophie character, (mini Schnauzer)
|

|

|
 11-06-2020, 10:50 PM
|
#17
|
|
Winnebago Master
Join Date: Dec 2009
Location: Out there, somewhere
Posts: 1,750
|
Here are more pics. These show the new front TV in place. And, the old bedroom Sony. Although it LOOKS like the new TVs are laid on top of the face frame, I can assure you THEY ARE NOT! The face frame was disassembled and cut to fit the new TV and re-assembled. As was the rear, bed room TV assembly. Both appear that Winnebago did the work. I'm just not one that likes the looks of a TV plastered onto the front of the cabinets, in order to get a GIANT TV in there. A 32" is plenty big enough for the front of our coach.
Scott
P.S. IF you click on each pic, you can expand and zoom in, to see any detail you wish.
__________________
2004 ITASCA HORIZON 36GD, 2011 GMC Sierra 1500 4x4 Toad '08 GL 1800 Gold Wing  Retired-29.5 yrs, SDFD, Ham - KI6OND
Me, Karla and the Sophie character, (mini Schnauzer)
|

|

|
 |
|
Currently Active Users Viewing This Thread: 1 (0 members and 1 guests)
|
|
|
 Posting Rules
|
You may not post new threads
You may not post replies
You may not post attachments
You may not edit your posts
HTML code is Off
|
|
|
|
 » Recent Discussions
 |
|
|
|
|
|
|
|
|
|
|
|
|
|
|
|
|
|
|
|
|
|
|
|
|
|